JavaScript Bundlers: An in-depth comparative 👍👎 Is Webpack still the best bundler in 2021? 📦


Hello, everybody! 🚀
For the last few days, I've been doing some research on the currently available JavaScript bundlers to try to draw my own conclusions about them and figure out which one would be more appropriate for my projects. And, of course, to find out if it's all about popularity and we developers are overrating some of them and underrating the others 😇
Since the only bundler I've been working with for the last few years is Webpack, I decided to take a look at npm trends to find out which the most popular JS bundlers are in 2021 and give them a try.
And this is what I got:
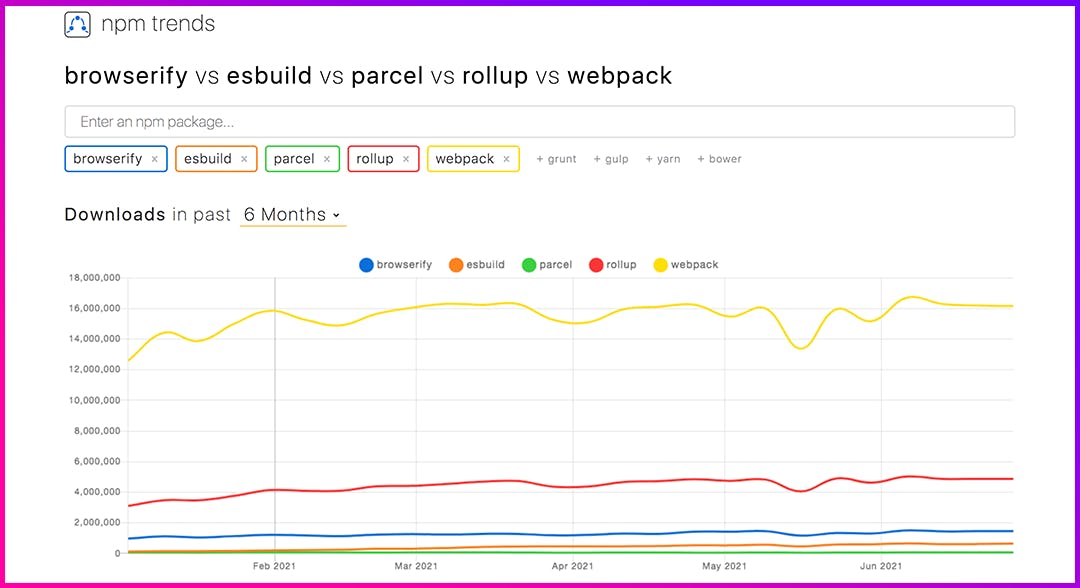
So today, we'll be making a comparison between the 5 most popular bundlers according to npm trends: Webpack, Rollup, Browserify, ESbuild and Parcel.
In this comparative, we will create a really basic scenario for each of them with a couple of the most used resources/tools these days, and we'll be talking about their pros and cons and comparing them all based on a few parameters.
First things first. What is a bundler? 🤔
A bundler is a tool that puts together all your JavaScript code and its dependencies and throws a new JavaScript output file with everything merged, ready for the web, commonly known as the bundle file.
These bundlers can work with other types of files as well apart from JavaScript, but they need a little help to perform their bundles. We'll talk about this more in depth in each of the examples below.
None of them require a config file, what perfectly works for the most basic bundle. This means you have a .js file converted into another .js file with minimal setup. But, once you start having more and more kinds of files that need to be transpiled and, consequently, configured, it's time to add a config file because, otherwise, you'll find yourself immersed in chaos 😰
The scenario 🖥
To try out these bundlers, we don't need a specific complex structure for our project, so let's propose a really basic scenario: an HTML file, with some styles (we'll slightly complicate it by using a preprocessor like SASS) and ready to use ES6, which means we will include Babel even though we're not using React, Vue or any library/framework that rely on it in this comparative. But let's get it setup anyway.
The project structure will look like this:
/dist
   bundle.js
   [styles.css]
/src
   index.js
/styles
   styles.scss
index.html
package.json
[*.config.js]
/dist will be the folder created after the bundle process and will contain all the bundled files. The bundled file for the styles is optional because we can choose either to inject the styles directly in the HTML or generate a new transpiled file containing the styles.
/src is the folder containing the entry point from which the bundler will start the bundle process.
/styles is the folder containing the original styles file, before the bundle.
index.html is the file containing what we'll see in the browser.
package.json is the file where all the dependencies, scripts and some configurations are stored.
*.config.js is the file where all the config for the bundler is defined. This file is optional for every bundler in this list, but highly recommended. * will be replaced accordingly by the name of the bundler.
Having said all this, let's see what each of these 5 bundlers can offer us.
1. Webpack
Loved by many, hated by some, known to all. And still the most popular bundler in 2021. With more than 15 million weekly downloads (at the time of writing this post), there's no doubt that Webpack is still the bundler par excellence in 2021. But, is it the easiest to use, configure and understand how it works?
Let's have a look at how we should configure it to have it ready to work.
Approach used by Webpack
- A build script
- A config file
- Loaders used to transform files
- Plugins for more complex stuff
package.json
...
"scripts": {
   "build": "rm -rf dist && webpack --mode development"
}
...
Really really easy. There's no need to do anything else for a basic configuration. Actually, if you don't want to use a different name for your configuration file, you don't even need to specify a configuration in the build script. If you want to use a different one, you should add --config your_config_file.js to the command.
Note that we'll be adding the command rm -rf dist to every build of every bundler. What this does is removing the dist folder every time a new build script is executed.
webpack.config.js
module.exports = {
   entry: "./src/index.js",
   output: {
      filename: "bundle.js",
      path: path.resolve("dist")
   },
   module: {
      rules: [
         {
            test: /\.(js|jsx)$/,
            exclude: "/node-modules/",
            use: "babel-loader"

         },
         {
            test: /\.html$/,
            use: "html-loader"
         },
         {
            test: /\.(scss|sass)$/,
            use: ["style-loader", "css-loader", "sass-loader"]
         }
      ]
   }

}
Maybe a little bit more tricky and difficult to understand at first than the other bundlers, but really easy once you get the sense of how everything works together.
What is happening in this config file? 🙃
Well, first, we need an entry point for our bundler to start merging everything. That is specified in the entry attribute and the file will be our file index.js in the folder src.
Same for the output file, we'll tell Webpack our file will be called bundle.js and it should be stored in the folder dist.
And now, what's only left is to handle the files that are not JavaScript (ES5). Webpack takes care of these files using loaders. To transform these files, we just need to indicate the file format and which loader(s) will deal with them.
So that's what we need: a few loaders to take care of our styles, our HTML and our JS (ES6 - remember that we're getting it ready for formats like .jsx): style-loader, css-loader and sass-loader for the styles, html-loader for the HTML files and babel-loader for ES6.
Notice that we're also transforming the HTML file (this loader will be useful if we want to add resources that are loaded directly in the HTML file, such as images). This loader is really useful in bigger projects, but not necessary in this case (due to its simple structure), we'll skip this step for the rest of the bundlers.
And this is it. Everything will be bundled once we run the build command.
About the bundle
Since we're using style-loader to bundle the styles, instead of a plugin to minify CSS and generate a new file (MiniCSSExtractPlugin), the styles are injected into the HTML file inside a <script> tag, so the only output file is bundle.js, which needs to be added to index.html.
What do I think about Webpack? 👇
I have to admit that first time I had to face Webpack I thought the configuration would be impossible. It was my first time using a bundler and I was barely able to understand the overall concept. Let alone all the loaders and more complex related stuff because it was a bigger project.
But after a few from-scratch configurations on my part, I have to say that now I find it more intuitive and easier to set up if I compare it to what it felt like to get to know the rest of them.
Let's take a look at the others and you'll understand why!
2. Rollup
Let's now turn our attention to Rollup. As well as the rest of the loaders, this has been my first time trying it out, so I'll also provide my first impressions about it 🤓
Approach used by Rollup
- A build command.
- An optional config file.
- Plugins used to transform files
package.json
Basic bundle with no config file:
...
"scripts": {
   "build": "rm -rf dist && rollup src/index.js --file dist/bundle.js"
}
...
Using a config file:
...
"scripts": {
   "build": "rm -rf dist && rollup -c"
}
...
A really easy command for building, as well, so nothing else to point out here.
Let's now check the config file, that is optional but recommended.
rollup.config.js
import babel from "@rollup/plugin-babel";
import scss from "rollup-plugin-scss";

export default {
   input: "./src/index.js",
   output: {
      file: "./dist/bundle.js",
      format: "cjs",
   },
   plugins: [
      babel({ exclude: "node_modules/**" }),
      scss({ output: "styles.css" }),
   ]
}
What Webpack defines as loaders, here in Rollup are called just plugins. This time we just need a couple of them: the one for transpiling ES6 into ES5 (Babel) and the one for SCSS: @rollup/plugin-babel and rollup-plugin-scss.
These plugins have also their own optional configuration. In this case, for Babel, we're excluding the folder _nodemodules and for SCSS we're giving the output file a different name. Otherwise, it will remain output.css.
For configurations with plain CSS, there's a plugin called rollup-plugin-css-only that works in the exact same way as the plugin we're using for SCSS.
Note that we need to specify the entry and the output points exactly as we did before with Webpack.
And that would be it.
About the bundle
The Rollup bundle comprises two files: bundle.js and styles.css. It's necessary to import the original styles files in the entry point index.js for the bundler to be able to find the file (there's no other place where we can reference it).
Also both bundles need to be added to the HTML index file.
My first impressions about Rollup 👇
To be honest, I wasn't expecting much of these other easier slash light-weight bundlers since Webpack has always worked for me, and I have to say that Rollup has surprised me in a good way.
I find it pretty similar with Webpack (config file with almost the same structure, plugins work in the same way as loaders to translate no-js files, the easy build command...), which means familiarity, usage recall and, consequently, ease of use.
The only drawback I've been able to find so far is the large number of dependencies it relies on, and consequently, the huge size of the project (3x a project bundled with Webpack). We'll be focusing on this more in depth at the end of the post 🔜
3. Browserify
Let's now talk about Browserify.
Approach used by Browserify
- No config file
- Transforms used to transform files
- Everything you need to configure ->
package.json
The method used by Browserify has nothing to do with the traditional approach of a build command and a config file. With this bundler, every possible configuration is allocated in package.json and the build command can get a little bit tedious if we don't have the concepts clear.
It also needs plugins (or transforms, as they are also called) to transform everything into something readable by the browser.
Let's have a glance at how we can configure it:
package.json
...
"scripts": {
   "build": "rm -rf dist && browserify -o dist/bundle.js src/index.js"
}
...
A very basic use of this bundler could be something like the code snippet above. We only have defined the input and output files (no configuration for styles or anything more complex).
Note the length of the build command having only declared the input source and the output.
Let me show you how it would look like if we add the suitable plugin for handling plain CSS.
...
"scripts": {
   "build": "rm -rf dist && browserify -t [browserify-css --output dist/styles.css] -o dist/bundle.js src/index.js"
}
...
Then, if we wanted to add some configuration to the plugin, we would do something like the following down below in the same file:
...
"browserify": {
   "browserify-css": {
      "autoInject": true,
      "minify": true,
      "rootDir": "."
   }
}
...
It starts getting not that maintainable.
And now, let's complicate it a little bit more by adding plugins for SCSS and Babel. We need a couple of plugins called Babelify and scssify.
Something to take into account
I've been trying out this bundler with the last released version of Node (v16.4.2) and the command line throws multiple errors when trying to install any dependencies that rely on
node-sass(scssifyandsassify, more specifically). A very negative point.
We could do this in two different ways:
- By saturating the build script with more content 😅
- By adding a transform property
Via the build script
For specifying several transforms in the build script using Browserify, we should add as many as -t [ transform options ] as needed, like this:
...
"scripts": {
   "build": "rm -rf dist && browserify -t [ scssify --output dist/styles.css ] -t [ babelify --presets [ @babel/preset-env ] ] -o dist/bundle.js src/index.js"
}
...
If you're using this method, pay close attention to the white spaces inside the arrays. They matter ✌️
I find this method tedious and difficult to understand, and above all, difficult to maintain. And we're only using two plugins. All said.
Via the transform property
...
"browserify": {
    "transform": [
      [ "babelify", {
            "presets": [
               "@babel/preset-env"
            ]
        }
      ],
      [ "scssify", { "autoInject": true } ]
    ]
  }
...
By using this method, the build script will look like it was originally, when it just performed the simple bundle of the input js file:
...
"scripts": {
   "build": "rm -rf dist && browserify -o dist/bundle.js src/index.js"
}
...
Much better 😊
About the bundle
The Browserify bundle consists of the bundle.js file and, only if we set an output file for the styles in the plugin that takes care of them, we'll get a styles.css file. Otherwise, the styles will be injected at the bottom of the <head> element in the HTML file inside a <script> element.
Take a look at this two different config examples for browserify-css:
...
[ "browserify-css", {
      "autoInject": false,
      "minify": true,
      "rootDir": ".",
      "output": "dist/styles.css"
   }
]
...
This config above will create a separate .css file.
...
[ "browserify-css", {
      "autoInject": true,
      "minify": true,
      "rootDir": "."
   }
]
...
And this other config will inject the code into a <script> tag in the head of index.html.
My first impressions about Browserify 👇
My less favorite so far. I don't find it as intuitive as the other two, and the approach it uses is totally different from what we are regularly used to. Also, I think the configuration is more tedious if at first you don't know how and where to handle the required plugins.
Also, blank spaces matter, and if you don't know that beforehand, you can perfectly spend 2 hours trying to figure out what's wrong with your code 👎
4. ESBuild
Time to talk about ESBuild.
Approach used by ESBuild
- A build command (encourages the use of the terminal)
- An optional config file
- Plugins used to transform files
With ESBuild you can use either the command line or a config file as well as the others, even for more complex configurations. It's totally up to you, but specifying a config file is always recommended for maintainability, scalability, readability and productivity reasons.
We're going to create a config file called esbuild.config.js and we'll execute it from the build script by running the command node.
But first, let's have a look at the simplest way to start bundling our files with ESBuild (no config file is required this time):
package.json
...
"scripts": {
   "build": "rm -rf dist && esbuild --bundle src/index.js --outfile=dist/bundle.js"
}
...
As usual, we declare the entry point and the output file. And that's it. But what happens when we need to keep bundling more different kind of files?
Let's then take a look at the following example:
...
"scripts": {
   "build": "rm -rf dist && esbuild --bundle src/index.js --outfile=dist/bundle.js && esbuild --bundle styles/styles.css --outfile=dist/bundle.css"
}
...
We are now bundling the styles as well, and adding a little more information to the build script (mess alert again!) by defining two different bundlers. We could (and definitely will) have more filetypes that would need to get bundled and this could become a total mess.
So, let's put aside this approach and let's create a config file.
esbuild.config.js
import esbuild from 'esbuild';
import { sassPlugin } from "esbuild-sass-plugin";
import babel from 'esbuild-plugin-babel';

esbuild.build({
   entryPoints: ['src/index.js'],
   bundle: true,
   outfile: 'dist/bundle.js',
   plugins: [sassPlugin(), babel()],
}).catch(() => process.exit(1));
And here comes what I found (let me say) weird and what took me some time to figure out.
Maybe because I was expecting to run this config file in the same way as Webpack and Rollup do (they run their config file by default if it exists and has the default name), I had some trouble trying to tell ESBuild to take it as an input for configuration.
Finally, I realized that it should be called via the node command to just run the script 😬
"scripts": {
   "build": "rm -rf dist && node esbuild.config.js"
}
And that was all.
Something I want to mention here is that, the fact that there aren't so many plugins from where to pick and also most of them are way outdated, doesn't make me particularly happy. And, if you allow me some advice, try to pick plugins which use either CommonJS (which inserts modules through require) or ES Modules (which does the same using import), because if you mix them up... the only things you'll get will be errors and mess everywhere! 😖
Just make sure you change the type attribute in package.json if you're using ES Modules (import) to load your plugins into the config file:
...
"type": "module"
...
Practically all plugins have been created by the community (if not all). For this example, I've chosen esbuild-sass-plugin for SASS/SCSS and esbuild-plugin-babel for Babel. Both of them work with import, so no extra problems.
A great point to mention: ESBuild is really fast compared with the others. At least in this scenario.
My first impressions about ESBuild 👇
Mixed emotions. At first, I thought it would be very easy to configure (it is if you only intend to perform a regular bundle) but then I started to struggle a bit with the config file, not because of the syntax but because of the multiple errors thrown on the terminal regarding Node.
5. Parcel
Let's now have a look at the last bundler in this list: the famous Parcel. Hi to the huge community of Parcel fans out there 👋
Approach used by Parcel
The Parcel approach is mainly based on a zero configuration environment 😱 I was reluctant to believe it at first (that's the main reason why I wanted to try it out so bad), but, yes, it's possible to bundle a project like the one we're testing in this post by writing the bare minimum configuration, in a few minutes and without racking your brains 🙌
Zero configuration? Are you sure? 😪
By zero they mean very little and precise. Let me show you the configuration I used for this basic project:
package.json
...
"scripts": {
   "build": "rm -rf dist && rm -rf  && parcel build src/index.js --no-scope-hoist --no-source-maps"
}
...
The procedure is pretty much the same: we need to indicate where the entry point for our app is located. And I also added the flags --no-scope-hoist to avoid odd behaviors regarding require when running js scripts and --no-source-maps to avoid the creation of sourcemaps. Otherwise, Parcel will create one for every bundle file by default.
Now, if we want to change the location and the name of the output bundle file, we need to change the value of the main property attribute in package.json, like this:
...
"main": "dist/bundle.js"
...
Otherwise, the bundle will be generated at root level and will be called with the name that is stored in main, in most cases index.js (if we didn't change it when running npm init).
Now, let's (zero)configure the styles and Babel
Since we're using SCSS, we need to use SASS as a preprocessor. So, what was my surprise when I read that SASS is already included with Parcel installation. But not only SASS, also LESS, Stylus, and... Babel! 😧
So the only step to take here is to create a couple of config files for SASS and Babel.
Our SASS config file will be named .sassrc and will contain the following code inside:
{
  "includePaths": ["node_modules"]
}
And when we run the build command, Parcel will automatically install the plugin @parcel/transformer-sass as a dependency and will create a bundle.css file in the same specified directory for the bundle, and that's all the configuration. Pretty cool, right?
Now don't forget to link this file to your HTML 🤗 And remember that your .scss file should has been previously imported on your entry point file in order for the bundler to know what file it has to transform.
On Babel side, we need to create a .babelrcconfig file to specify the needed presets (let's say we want to get it ready for using React in the future):
{
   "presets": ["@babel/preset-env", "@babel/preset-react"]
}
Parcel will automatically call @parcel/transformer-babel and will do the job for us.
Don't forget to previously install @babel/preset-env, @babel/preset-react and all the dependencies needed by React.
And that's... it. We're all set and ready to rock 😁
My first impressions about Parcel 👇
The first thing I want to point out is that Parcel wasn't that easy for me at the beginning since I had a really (really) hard time trying to get it ready to work, and it seemed like it wouldn't stop throwing errors regarding the OS and creating more trouble out of outdated versions of some dependencies 😥 So, to be honest, Parcel wasn't going to be in this list because I didn't want to talk about it if I couldn't try it out myself.
But, magically ✨ (and due to my tireless perseverance 😅), I finally could make it and set everything up to get it ready 🙌
And after that, it was really easy compared to the rest of the bundlers. So let's draw a veil over the setbacks and let's give it a chance.
Parcel is also pretty fast, because it uses cache.
But... something I don't like at all is the several security vulnerabilities that appear after installing it (around 12, some of them high risk) 😖 That doesn't speak well of you, Parcel. Not to mention the huge size of the project. The heaviest in this comparative.
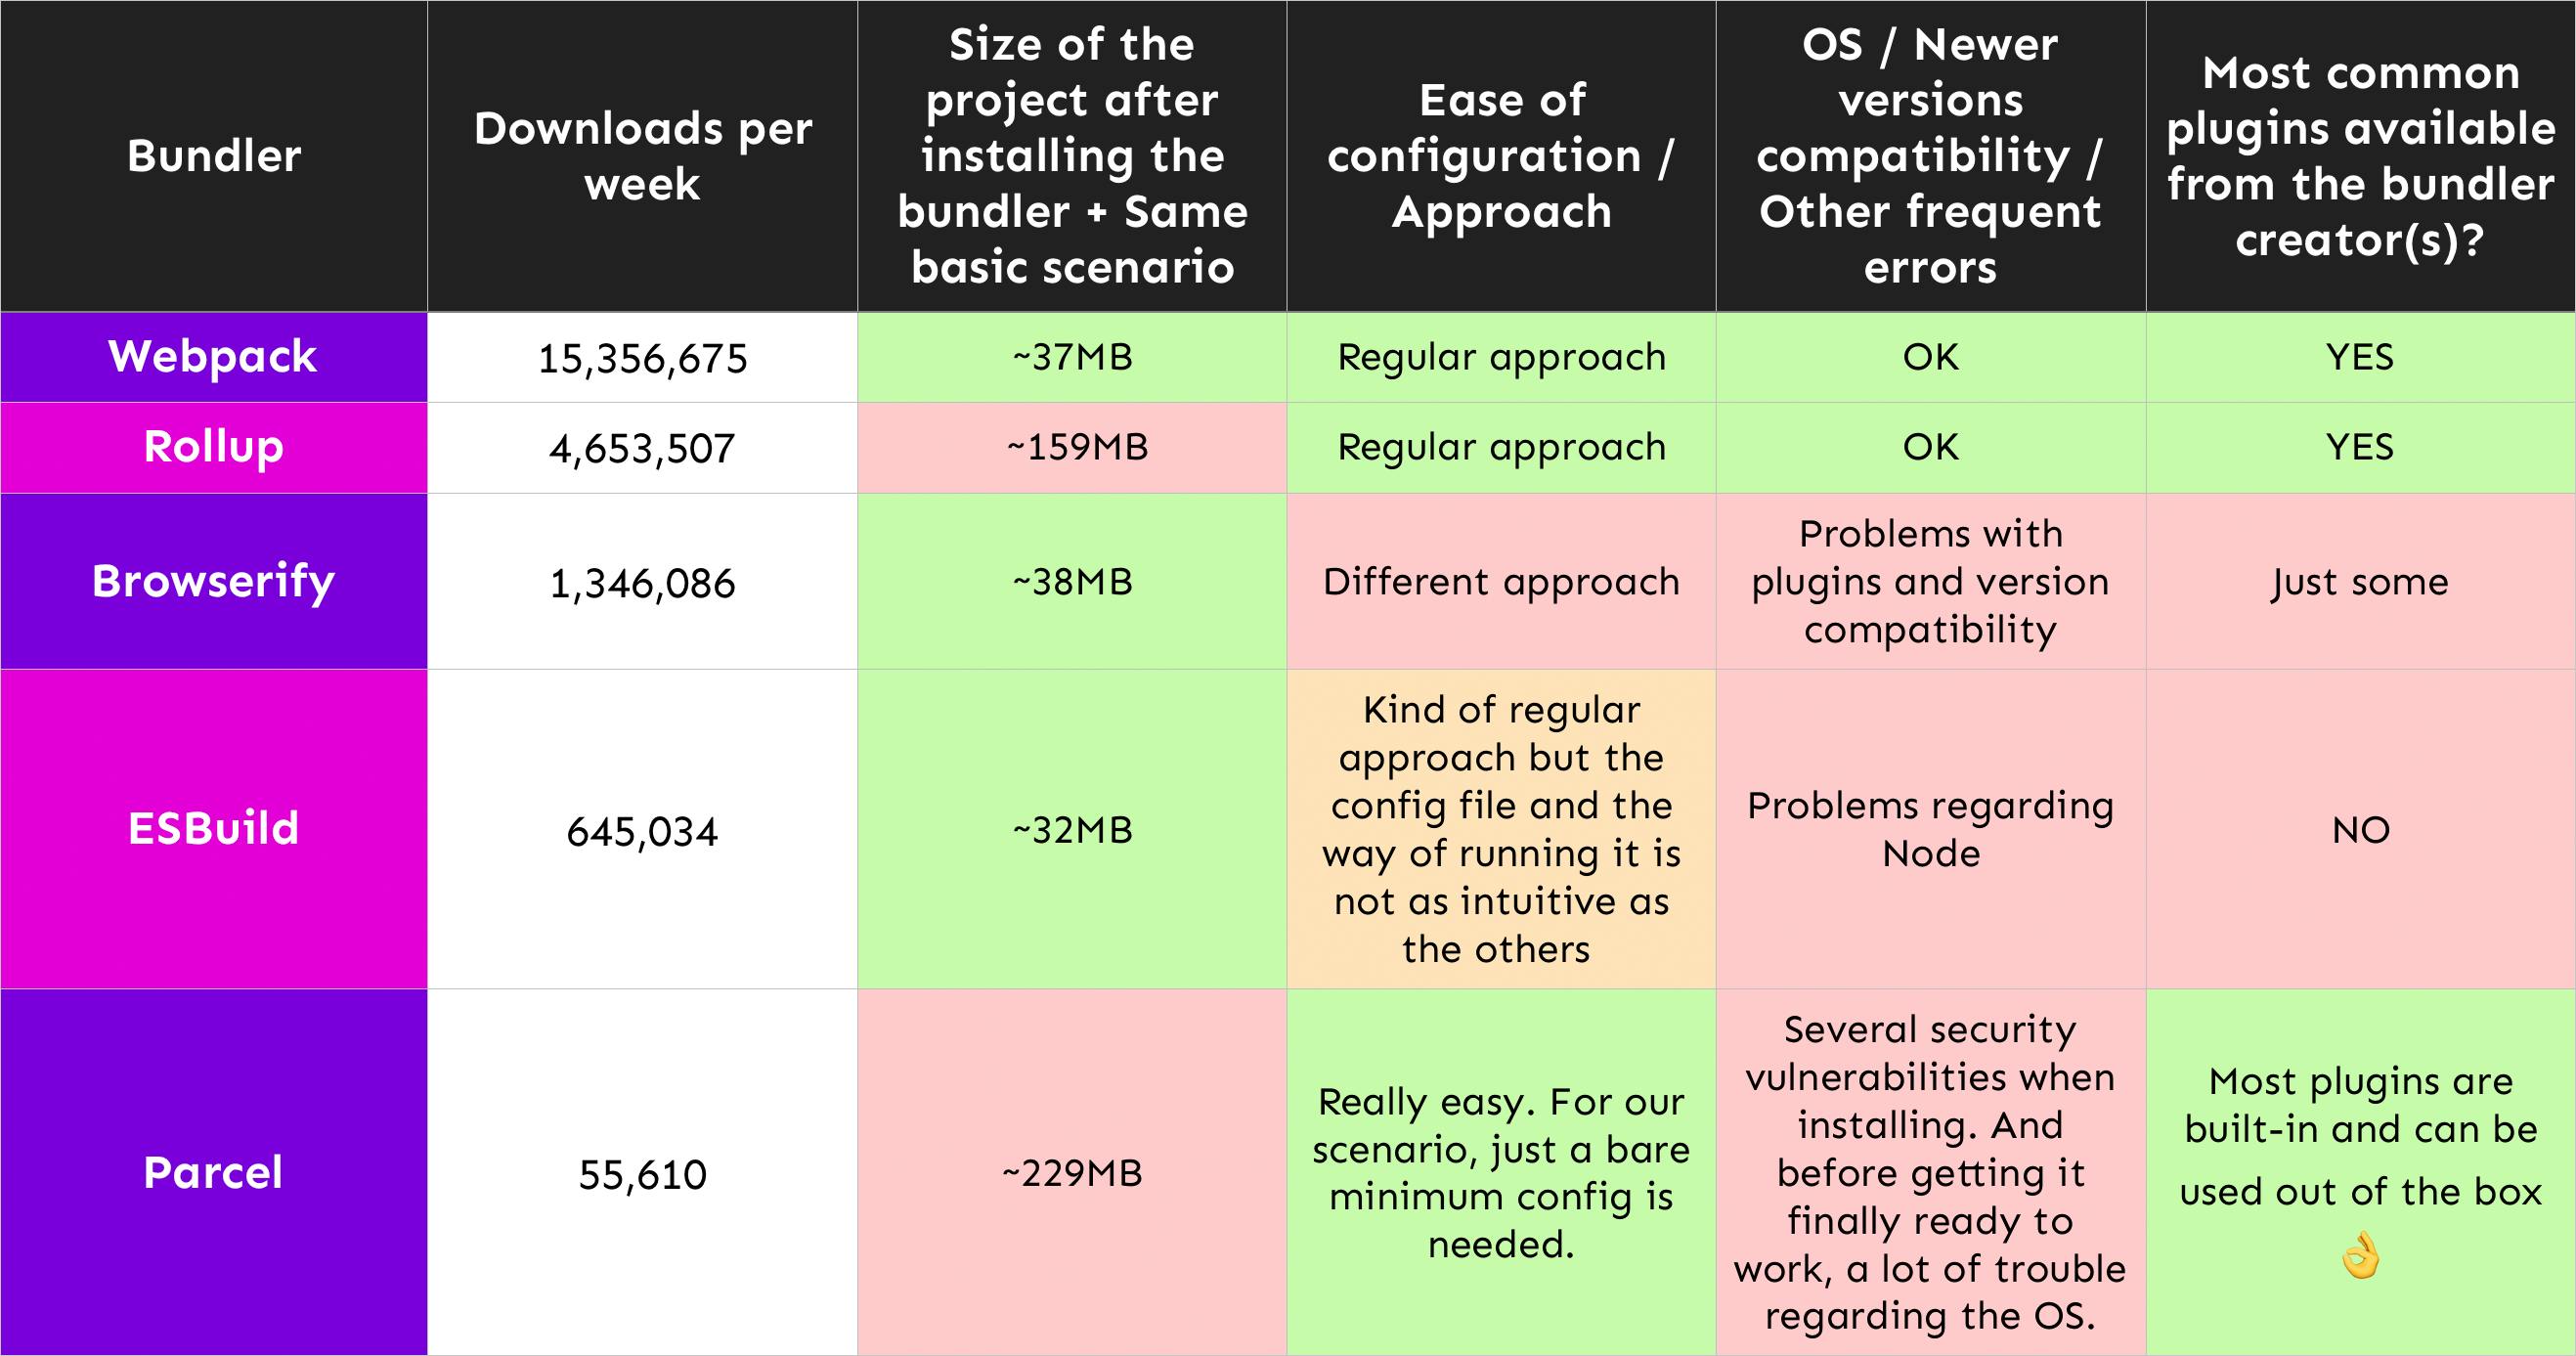
The comparison 📈
Here you have the highlights of this comparative summed up in a table:
What is my final verdict? 😼
Well, I think some of these other bundlers apart from Webpack can be cool to use for small or side projects, but in reality, I personally think that Webpack is still the best option for robust projects (we just have to look at the huge number of downloads per week compared to the rest).
Also, I find it the easiest to manage since once you get the sense of how it deals with configuration, it's easier to keep adding values to that configuration. But it's not something that obvious. You have to take your time playing with it to get a very basic idea at first.
Moreover, you have the majority of resources you need (loaders, plugins...) available from the creators, so you make sure you're using a real source of truth. And they are updated really frequently, so you can use it without worry with newer versions of Node and other packages.
So, yes, I will keep choosing Webpack as my first option over the others.
My second choice would be Rollup for sure, and I truly think I will definitely use it in some of my side projects since I found it intuitive to configure and it seems like it works properly on robust projects as well.
And about their plugins, most of them are also available from the creators, so, again, a real source of truth and many more advantages.
I also think Parcel is a very interesting option and I'd like to try it with larger projects and check if it really doesn't need further configuration. Definitely a great find.
And a big plus to the fact that plugins like Babel, SASS, LESS and some more are built-in and ready to use out of the box.
What about Browserify and ESBuild?
These two have been the ones with which I have struggled more, especially Browserify. The fact that it doesn't require a config file and everything should be declared in package.json kinda forces you to change the way you think of how bundlers are traditionally configured. Not to mention you end up saturating the file with way a lot tricky configurations, which makes it difficult to read and maintain.
Also, when it comes to plugins, most of them are not developed and maintained by the creators (especially the most common) and are really outdated (many of them haven't been updated in the last 4 years) and this fact leads to problems with newer Node/other packages versions and compatibility in general.
And on ESBuild side, I didn't especially like it either. The first impression was good but then, since the config file caused me some trouble, it mainly ended up in confusion about how to manage configuration with and without this file. So I found it quite ambiguous and took me a bit to realize how to set up both scenarios in different ways.
About their plugins, same as Browserify, practically all of them has been created by the community, not the author, so you have to use them at your own risk. But as a plus point, they are often updated and maintained.
Now it's your turn! 🔥
What do you think of this comparative? Do you agree? Which one is your preferred bundler? Do you know some other bundler that is not on the list? Would you like to suggest different bundlers for future comparative posts? Comment below!
Disclaimer 👇
Remember this is just a post showing my impressions about something I tried for the first time. I have decided to share the process with you and my opinion about what I experienced. The opinions expressed in this post don't mean that some bundlers are better over others. My advice is to try them all out and draw your own conclusions, like I did. And based on that, use the ones you like best and fit your needs.
🎉 Don't forget to follow @underscorecode on Instagram and Twitter for more daily webdev content 🖥🖤
Thanks for reading!